AVVID Developer Guide
What's New With AVVID
01/01/20
Lorem ipsum dolor sit amet, consectetur adipiscing elit, sed do eiusmod tempor incididunt ut labore et dolore magna aliqua. Ut enim ad minim veniam, quis nostrud exercitation ullamco laboris nisi ut aliquip ex ea commodo consequat. Duis aute irure dolor in reprehenderit in voluptate velit esse cillum dolore eu fugiat nulla pariatur. Excepteur sint occaecat cupidatat non proident, sunt in culpa qui officia deserunt mollit anim id est laborum.
Lorem ipsum dolor sit amet, consectetur adipiscing elit, sed do eiusmod tempor incididunt ut labore et dolore magna aliqua. Ut enim ad minim veniam, quis nostrud exercitation ullamco laboris nisi ut aliquip ex ea commodo consequat. Duis aute irure dolor in reprehenderit in voluptate velit esse cillum dolore eu fugiat nulla pariatur. Excepteur sint occaecat cupidatat non proident, sunt in culpa qui officia deserunt mollit anim id est laborum.
Getting Started With the AVVID Developer Tool
The AVVID developer tool allows you to make object detection projects without writing a single line of code.
Creating Your First Project
To get started with your first project, click on the "New Project " button in the dashboard. Give your project a name. Your project will group detections that you are going to be running on one type of images. For example, if you are detecting traffic objects - cars, trucks, street signs - you can name it "Traffic" or something similar.
You will then be asked a few question about the project your are setting up. We use this to determine what settings will be best for your project. Don't worry, you can always change these later.
Finally, upload your image data set into the project. You can skip this step for now if you are not ready to upload any images, but it will be one of the first things you should do when you make a new project.
Adding Your Images
Now that your project has been created, you need to add a data set of images if you haven't already. The images you use to train your projects are very important. The clearer and more diverse your images are, the better your projects will be at detecting your classes. Your images should reflect the types of images you are going to be running detection on when using the API. Different angles, perspectives and sizes will increase your detection accuracy.
As a general rule, you should have a minimum of a few hundred images for each class you are trying to detect, with more images for more complex classes. You want at least 300 instances of an object your are trying to detect in your data set, but the more you add, the better your detection will be.
You can add and manage your images in the image manager on your dashboard.
Read more about how to choose images for your data setCreating your first class
Classes are things you are trying to detect. A class can be anything you want: animals, vehicles, consumer products, etc.
You can use your project to detects instances of your classes in a photo. Eg: for a "Traffic" project, you might want to detect vehicles, pedestrians, traffic lights and traffic signs.
To create a class, in your project, go to the classes page and click the 'Create Class' button at the top right of the page. Give your class a descriptive name and click 'Create'.
You can make many classes for a project, depending on what you are trying to accomplish. You can also use some of the default classes available to you in Avvid's basic models. More on that later
Continue reading about classes.Labeling Your Images
Next up is to label your images.
Navigate to the labeling page in your project. There you will see all the images you uploaded. For each image, draw detection boxes around each of the objects.
This can be a tedious process but it is very important. You need to make sure that each of the object you are trying to detect have boxes drawn around them. The quality of your detection model is directly dependent on the quality of your labeling. Make sure that your detection boxes perfectly fit the object you want to detect, and that you don’t skip any objects in the labeling process.
Read more about how to properly label your imagesTraining Your Model
Once you have a good selection of images, and they are all labelled nicely you are ready to train your project!
Go to the training page in your project - the first time your train your model, you won't see much on this page. Click the "Train" button at the top right.
This process can take some time. Depending on the number of iterations you chose at the beginning, it can take anywhere from 4 hours to a couple of days.
Once your training is finished, you're ready to use your model!
Using Your Model
Awesome, everything is set up and you’re ready to use your brand new machine learning model!
Before using your model, you can test it out on the testing page. Just click the "Run Test" button at the top right and upload an image to test. You will get back an image with detection boxes drawn on it, as well as lots of other useful data.
It is good to test your model with images that were not in your original data set. Good machine learning models will detect objects in images that are similar to the images they were trained on. If you are getting good results from images you trained on but poor results from new images, your model might be over-fitted It might take a few tries to get your model just right.
Once you are happy with the model, you can use the API to run image detection on any images you want from your applications, just send your images in a post request and get JSON data back of all the detections.
Check out our developer documentation to learn more about how to post images to the API, and what kind of data to expect in return;
Image Manager
The images you add to your project are used to train your model. The better the images, the more accurate your detection model will be.
How to Choose your Images
Choosing you images to add to you data set is an important process. You want to choose images that will reflect the types of images you are going to be running detection on in a productions etting.
Adding Images to a Data Set
There are a few ways to add images to your data set. Click upload on the Image Manager page and you will see an upload box. You can drag in multiple files into the box and upload them to the project. If you are uploading a lot of images, you can compress them into a .zip file for easier uploading. Just drag the .zip into the upload box, the web app will unzip the file for you and add all the contained images to the data set. Make sure that none of the images are in folders in your file. Only images at the top level of the file will be added.
Adding Video to a Data Set
You can easliy add video to your data set in the image manager. Click the upload button and add a single video file (currently only one video file at a time is supported). You will be asked how you want the frames of the video split, then the video will be split into individual frames that you can label!
Editing and Managing Images
You can easily manage all of you media content in the image manager. You might want to duplicate, rotate and/or crop some images in your data set for better training and detection. This can all be done easily in the image manager, just hover over an image you want to edit and the controls will appear.
Classes
A class is just something you're trying to detect. Classes can be defined in the web app, and are used to run object detection on images. Common examples of classes you may want to detect include: cars, people, and animals. You can be as general or specific as you want: you can have animal as a class, or dog, or German Shepherd, it just depends on what you want to accomplish with your project.
Adding Classes
You can add classes to your project in a few different places.
Standard Classes
AVVID will help you add classes to your project using standard detection models. You can simply click on the ‘auto-detect’ button in the labeling page. A pop up will appear with a list of standard models to choose from. These are generic classes that you can use in any project to speed up your own detection.
Some standard models you can use include: cup, banana, boat, suitcase, etc.
If you're curious here is a full list of available models.
Categories
Categories are similar to classes, but differ in a few important aspects. Categories are used when running categorization on images, where classes are for detection.
Labeling Your Images
Labeling your images is an important step to train a good model. The quality of your detection is directly related to the quality of your labeling
How to Label your images
Navigate to the labeling page. It will show you all of the images that you have added to your model. Starting from the first image, choose the first class you are labeling from the right toolbar, and draw a detection box around every instance of the class that you can identify in the image. Once you are happy with the labeling, mark the image as labeled, and continue to the next one.
Here are some tips for well labeled images:
-
Keep it Tight
Keep your detection boxes as tight as possible when drawing. Do not add too much padding around the objects you are labeling.
-
Don't miss anything
When labeling an image, try not to miss any of the instances of the object you are looking for. Unlabeled objects can have a negative impact on you final detection model. If the objects are too small or blurry, you may want to crop them out.
-
Here's another heading
Lorem
Labeling Statuses
Each image has a labeling status associated with it. This is to allow you to add a lot of images and not label them right away without affecting your training.
There are three statuses:
- Unlabeled
- In Progress
- Labeled
Note that only images that are marked as Labeled will be used to train your model. Once you draw one detection box on an image, it will be marked as in-progress. Once you have finished labeling an image, and you want it to be used to train your model, be sure to mark it as Labeled
Common Labeling Mistakes
Here are some pitfalls you may run into when labeling your model. They can lead to poor detection results and should be avoided.
Speeding Up Labeling
Labeling images can be a time consuming task. Luckily we have added several features to the labeling tool to help you speed up this process.
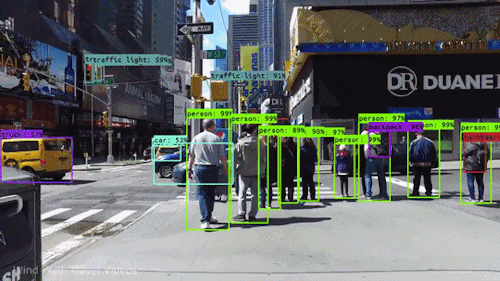
---Labeled screenshot of the labeling tool (when finished)---
Training
Training is the process where the model learns to detect objects in an image. It learns by identifying various patterns, shapes, colors, position, etc. through complex mathematical computations.
Luckily, you don't need to worry about how it works, we take care of that for you! The training page will take all of your labeled images and look for patterns in the images to build your model! This process can take some time, depending on how many images, classes and iterations are in your project, so make sure everything is set before beginning training.
How to Train Your Model
Once all of your images are labeled well, go to the Labeling page, and click on train. That will begin the process of training your model. This process can take a while depending on a few factors, so make sure you're ready when you start the process! You will be sent an email when the training process is complete.
Iterations
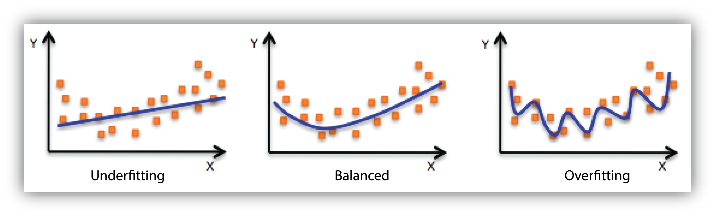
The training process consists of many iterations, where the models you are creating try and correct themselves. More iterations gives the model more time to identify traits and patterns in your images, generally resulting in a more accurate model. However too many iterations can result in a model that is over-fitted (Where detections work very well on training images, but not on real images.)
Choosing the Number of Iterations to Run
In general, 3000 iterations are good if the images are of the same view - coming from a still camera. For images that are more diverse, increase the number of iterations to 5000 or even 10000. It may take a few tries to get your model just right.
Training Times
Training times can vary greatly depending on how many classes are in your project and the number of iterations you choose. It can take roughly 3 - 5 hours for every 1000 iterations. To view the status of the training, just visit the training page.
Testing your Model
Testing your model is the best way to determine how accurate it will be when running detection on unlabeled images.
How to Test Your Model
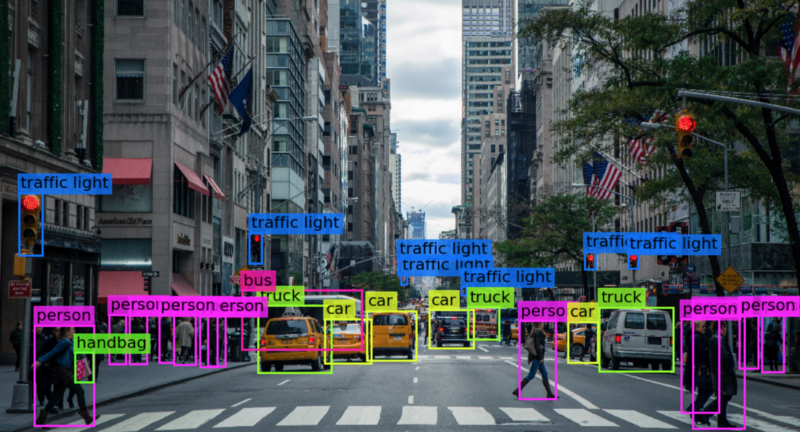
Testing can be done from the testing tab in your project's dashboard. You can upload sample images and run detection on them. You will get back a labeled image, a list of any detections that were found in the photos, and the confidence of the detections. It is a good idea to test your model with images that were in your original data set as well as new images before using your model in any applications.
Testing Results
Testing results are the best way to evaluate the efficiency of your model. A well trained model should be able to detect most objects in a new image, as well as most objects on an image it has been trained on. If your model is detecting everything in images it has been trained on, but cannot detect any object in new images, it may be over fitted. It may take a few tries and tweaks to get your model just right.
Over Fitted Models
Overfitted models are models that have been trained too much. These models will be very accurate when given any of the images they have been trained on, but will react poorly to any new data that is given to them. Since they were overtrained on the training data, these models are unable to generalize and are useless at detecting objects in any new data.
Underfitted Models
Inversely to an overfitted model, under-fitted models were not trained enough on their data. They can detect some sort of trend in the data they were trained on, but not enough to be able to make any meaningful detections.
Perfecting Your Model
It might take some time to get your model just right, and able to generalize enough to be useful in your applications.
Running Detection Through the API
Adding Images
You can add Images to your project through the API. The images will be added unlabeled to the end of your image queue, so the next time you log in you can label them and train your model.
Optical Character Recognition
You can use the API to run Optical Character Recognition (OCR) on any image you would like.
Image OCR
Explain what OCR is
Data - rename
Explain the format data will be returned